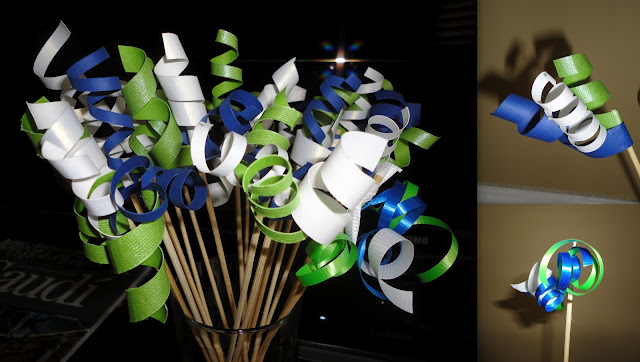
For this shower, I
found these
stirs online and decided to make my own. In looking at the
stirs my first thought was 'ribbon' although the tutorial uses the
vague term 'craft paper'. Sounds like its time for a trip to the craft store!
This was an internal war; super simple ribbons or time consuming craft paper. For the ribbon stirs (bottom right) I purchased regular curling ribbon for wrapping gifts in the shower colors. Ribbon became even more appealing when I realized the sparkly colors available and while it was a temping to buy lots of metallic colors I decided instead to to limit myself to using metallic silver ribbon in lieu of white for half of the stirs. For these stirs I simply cut a length of ribbon, tied them to the top of a kabob stick, and curled with a scissor. For each stir I used three 8” lengths of ribbon and tied them to the stir separately. Ta-Da! (Tip: I found that tying the second and third knot around the first helped strengthen it)
Now, the craft paper stirs (top right and left). Walking through
Michaels I found a wall of Recollections cardstock
12”x12” paper sold by the sheet. The paper was
fairly ridge and thick which concerned me, but ended up being perfect to hold the shape of the curl. Additionally some of the papers had a
slight texture (the green) and others had a slight
sheen (the white). I made over 40 stirs using the craft paper and
didn't go through more than one sheet of each color.
To make the stirs
I used an exacto knife to slice the paper into strips. (If you're lucky enough to have a paper cutter, I'd highly recommend using it.) I varied the
thicknesses between the 1/4” and 3/4” range to try and add a
little interest. Once I cut the strips to the width I wanted, I would
cut them in half so each was 6” long. These strips I curled around
a pencil. I found I could curl the strips around the pencil at
different intervals to produce loose wide curls and short tight
curls. (Nerd Alter: If the curls were a sine function, this would be the period.) To attach the curls to the kabob skewers I used elmers glue and
placed a dot on the end of each curl before wrapping it around the
stick. I often found that the different curl sizes allowed the three strips of paper to start with a slight overlap which help
them adhere to the stick. The stirs could be placed in a cup to
finish drying after only a few seconds of holding the glue in place.
I found that I
liked the paper stirs the best and made a majority of those, however
after several hours I decided to finish up by quickly making a bunch
of ribbon stirs just to be sure we wouldn't run out. The total number
of stirs I aimed to make was twice the number of guests invited.
The last step was
to cut the stirs to length. Before doing this, check
the length of the glasses you plan to use them in. For my stirs I
started with 10” kakob skewers and cut 2” off of each.
Remember, you want to keep the ribbons/paper out of the drink, but
they also add extra overall height. To cut the skewers I
used wire cutters and sanded the ends slightly with sand paper. The
wire cutters got the job done, but sometimes they would start to
splinter the sticks which is the last thing would want to put into
your drink. Let me know if you have a better method for cutting the
kabob skewers. My next best idea would be to find a tool with a serrated
edge.
Summary:
I
enjoyed this craft and found it added a nice personalized touch to
our party. Using the craft paper to make the stirs will take some
time, but is worth it in the end. I think this would be super cute to
use at superbowl party or tailgate in your favorite team's colors.


No comments:
Post a Comment