 |
| Swirl Nails, using water dip technique |
 |
| Swirl Nails, using 'sticker' technique |
Searching around on Pinterest I found two main methods of creating swirl painted nails. The first method, which appears to be most common, involves floating polish on a glass of water and dipping your nail into it. The second method had the user create a 'sticker' of nail polish which was then applied to their nails. I decided to put both of these methods to the test, water method on my right hand and sticker method on my left. See the results for yourself.
Method 1: Water Dipped Nails (original
tutorial)
Items needed:
Small glass of room temperature water (such as a shot glass),
toothpick, at least 3 nail polish colors.
- I removed all of my prior nail polish. A difficult task considering my previous nail polish was a glitter polish.

Start with clean nails - Paint all nails with a base color. I chose a nude color for two reasons; I didn't want a color that would hide or compete with the finished treatment and because this particular nail polish was runny and would easily drip.

Paint Nails in a solid base color - Fill a shot glass with water. Either use room temperature water, or let it sit briefly until it reaches room temperature.
- Drip chosen nail polish colors into the glass one at a time. (My first drop may have been into too cold water because it remained a sphere rather than spreading out on the surface.) Once I got going, I would drip two drops of each nail color into the water before adding the next color. Two drops of each color helped increase the strength of the colors. This step (and the next) must be done fairly quickly or the polish will start to dry.

Drops of nail polish floating in water - Once you have several concentric circles on floating polish, 'swirl' the colors together by slowly dragging a toothpick through the glass.

Floating nail polish after being 'swirled' with a toothpick. - Submerge your nail completely into the glass. Then remove from water.

My nail (and finger) after being submerged in the glass. This is why clean up is needed!! - Cover with clear top coat.


 |
| My hand before clean up. |
Overall: My nails look pretty awesome :) However the first inch of each of my
fingers was also 'tie-dyed'. This involved lots of clean up of the
skin around the nails.

|
| My nails after some clean up. (Note: the third finger looks much different, this is because I only used 1 drop of each color instead of two. ie step four.) |


Method 2: Sticker method (original tutorial)
Items needed:
Plastic zip-lock bag, toothpick, tweezers, at least 3 nail polish
colors.
- Remove previous nail polish.
- On plastic bag, paint a square of the base color. (I suggest making this a fairly thick layer.)

Base color on a plastic bag - While base color is still wet, add strips of the other colors on top of it.

Strips of additional color - Swirl colors together by dragging the toothpick through it. If possible swirl the colors together without allowing the toothpick to create veins all the way through to the plastic bag.

Swirl colors together. Then let dry - Let the plastic bag dry. (At least an hour, maybe more depending on the thickness of the polish layer.)
- Paint your nails a base coat and allow to dry until 'tacky'. (Mine were closer to fully dry and it did not effect the outcome.)
- Using tweezers, peel off the 'sticker' you created on the plastic bag.NOTE: I found this to be terribly difficult. The polish often ripped into small pieces, stuck to itself, or stuck to my hand. As I got towards the middle of the sticker, where the polish was thicker, I was finally able to peel off parts of the sticker in long strips. I also had better luck using my fingers to peel whereas the tweezers would case rips.

My 'sticker' ripping as I try to peel it off of the bag. - Press the 'sticker' to your nail like a decal. To place additional pressure on the sticker without ruining it, I would place the plastic bag over my hand and then press the decal on.

Decal on nail, notice excess that needs to be removed
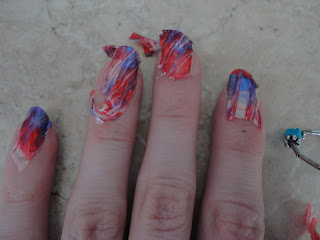
All of my nails. I did them all at once since the sticker was so difficult to work with, then I'll go back to remove the excess. - Cover with clear top coat.


 |
| My finished nails using the 'sticker' method. |
Overall: This
method was less messy, but my finished nails didn't look as good as
the previous method. This method can also be extremely frustrating
trying to peel off the sticker.

UPDATE: after a day of wearing my 'sticker method' nails, bubbles have started to form beneath the decals.

UPDATE: after a day of wearing my 'sticker method' nails, bubbles have started to form beneath the decals.
|
|


Summary:
Surprising, both methods worked!! However the WATER DIPPED METHOD was far and away my clear favorite. Besides for the ease of it, the overall effect was much nicer and cleaner. The only negative was the amount of clean up required for the surrounding skin... but this isn't much different than when I normally paint my nails :P
Surprising, both methods worked!! However the WATER DIPPED METHOD was far and away my clear favorite. Besides for the ease of it, the overall effect was much nicer and cleaner. The only negative was the amount of clean up required for the surrounding skin... but this isn't much different than when I normally paint my nails :P
No comments:
Post a Comment